Halter Painting Tutorial
This tutorial will show you how to paint an Arabian show halter on your sims 3 arabian horse. This tutorial is written using Photoshop CS5
but should work with any version of photoshop or program that uses layers and layer styles. Clicking the tutorial Image will open the larger version.
but should work with any version of photoshop or program that uses layers and layer styles. Clicking the tutorial Image will open the larger version.
|
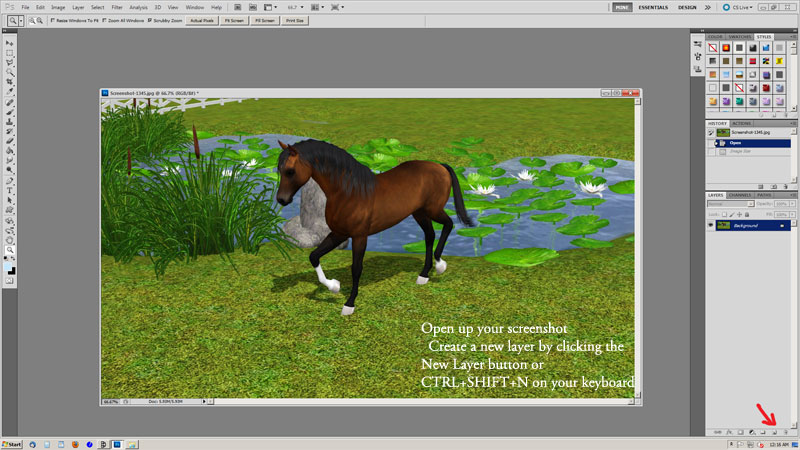
First you will need a nice screenshot of your horse without any headwear on. For this tutorial I will be using a photo of my Lovely SH Unchained Melody. When you have the screenshot you wish to use open it up in photoshop. Create a new layer above your screenshot by going to layer>New Layer or using CTRL+Shift+N on your keyboard.
|
|
|
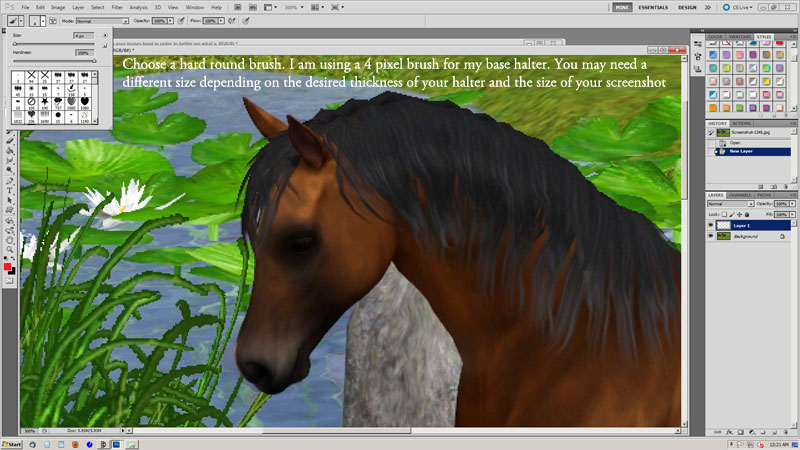
Zoom in close on your horses head so you can see what you are doing. Now choose a hard round brush to paint your halter. My brush for this particular image is going to be 4 pixels in size. You may need a different size depending on the size of your screenshot and the thickness you want for your halter.
|
|
|
Now that you have chosen your brush us it to paint the base of the halter on the new layer. Remember that you do not want to draw perfectly straight lines they should follow the curve of the horses head.
|

|
|
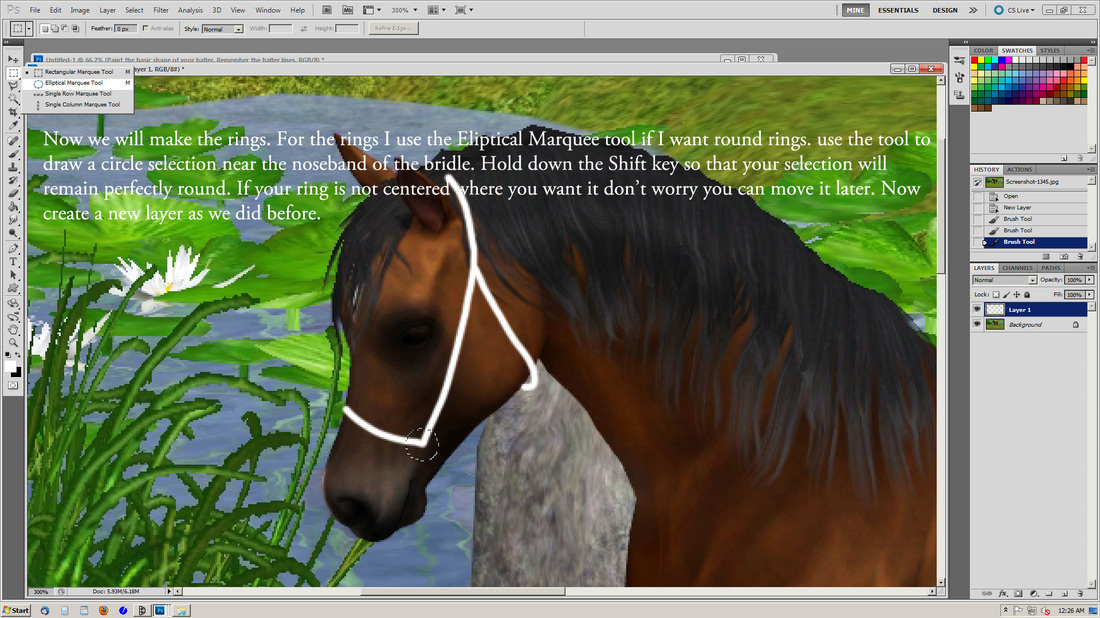
Now that you have your halter base the way you like it make a new layer on top of your halter base layer. Using the circular marquee tool create a circular selection near the noseband of your halter in a size that you want your ring to be. Hold down shift while you draw your selection in order to make a perfect circle. If your selection is not centered where you need it don't worry you can move it later.
|
|
|
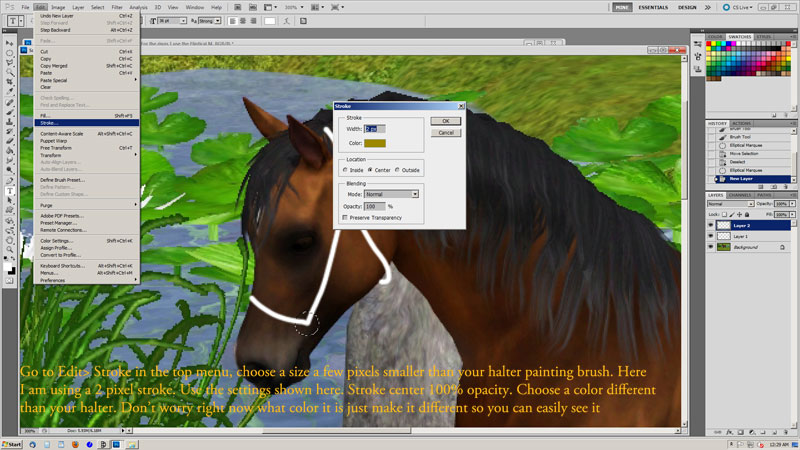
Make sure you have your new layer as your active layer. Go to edit>stroke and make a stroke around your selection, choose the settings shown in my screenshot. Use the center stroke. I used a 2 pixel stroke. Choose a different color than your halter so you can easily see the ring.
|
|
|
With your ring layer selected go to Layer>Duplicate Layer and make a copy of your ring layer. Now drag the ring up to where the throatlatch intersects with the main part of the halter. Make any adjustments you want to make to the ring positions now. When they look correct to you move on to the next step.
|

|
|
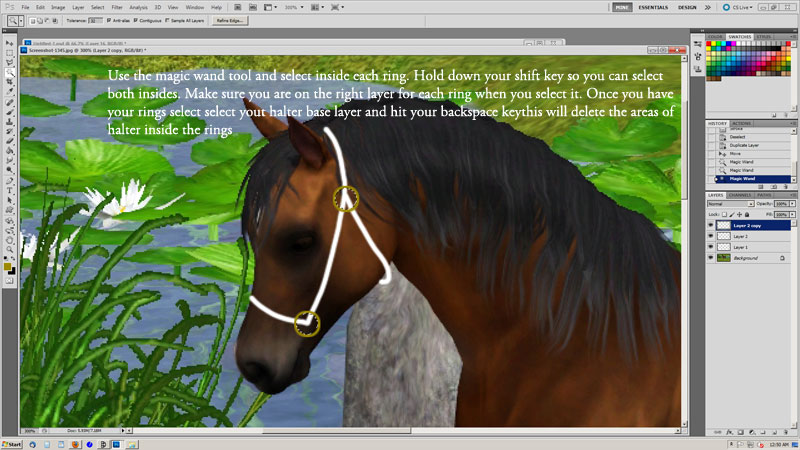
Using the magic wand tool select inside each ring. Hold down the shift key in order to make multiple selections. Make sure you are on the correct layer for each ring when making your selections. Once both ring insides are selected make your halter base layer the active layer and hit your backspace key. This will delete the area of the halter base that is inside the rings. Once you have done this, drag your halter layer above the ring layers so the halter lays on top of the rings.
|
|
|
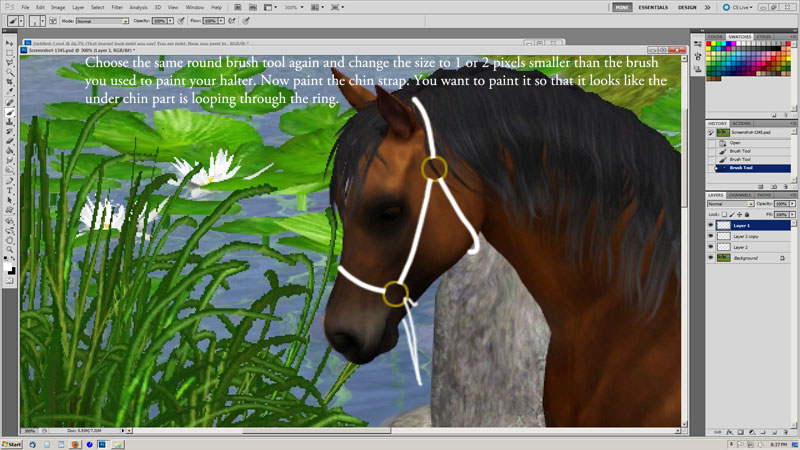
Choose your round brush again and change the size to one or two pixels smaller than the size you used to paint your halter base. Use this brush to paint the chinstrap. Paint it carefully to make it look like it is looping through your bottom ring.
|
|
|
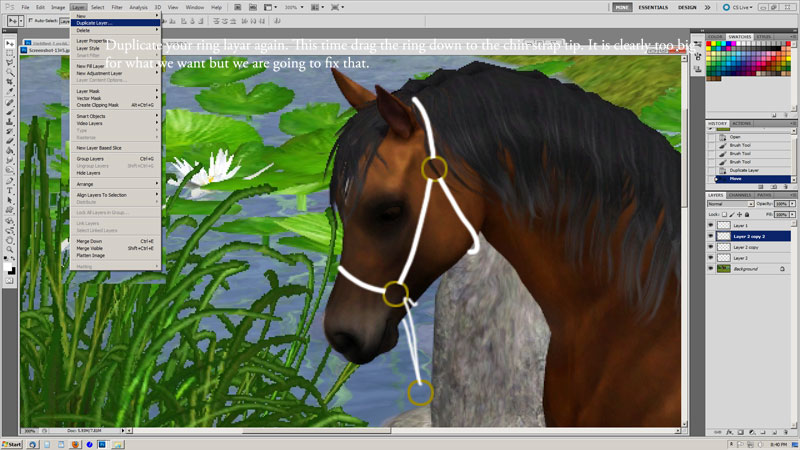
Now we need a ring for the lead rope. Duplicate your ring layer again and drag it down to the tip of your chin strap. It is too big. Don't worry we will fix that
|
|
|
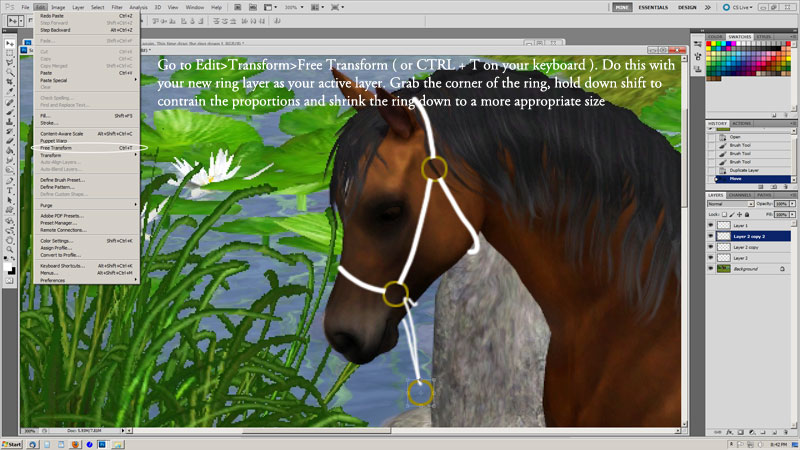
Go to edit>transform>free transform with your ring layer selected, or CTRL+T on your keyboard. Grab a corner of the ring, hold down shift and drag it to make it smaller. Make it a size that seems appropriate and then hit enter to apply your transformation.
|
|
|
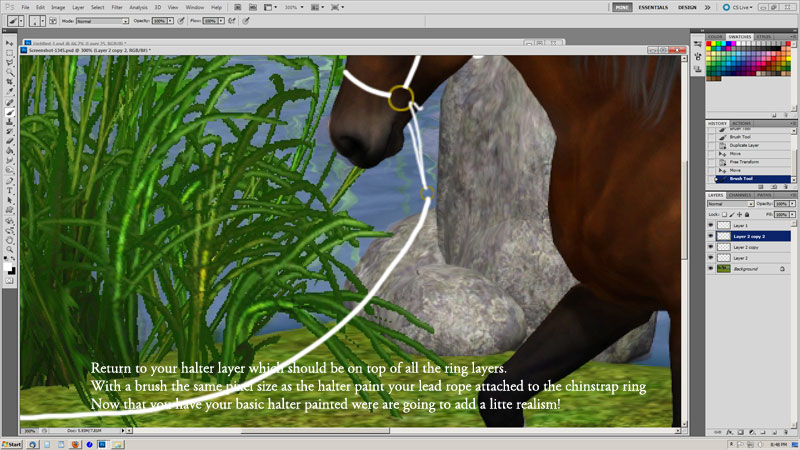
Select your halter layer and using your round brush again paint your lead rope. I use a brush the same size as my halter brush usually though you can change the size to suit your personal preference. Paint your lead attached to the chin strap ring. Be sure you are painting on the halter layer.
|
|
|
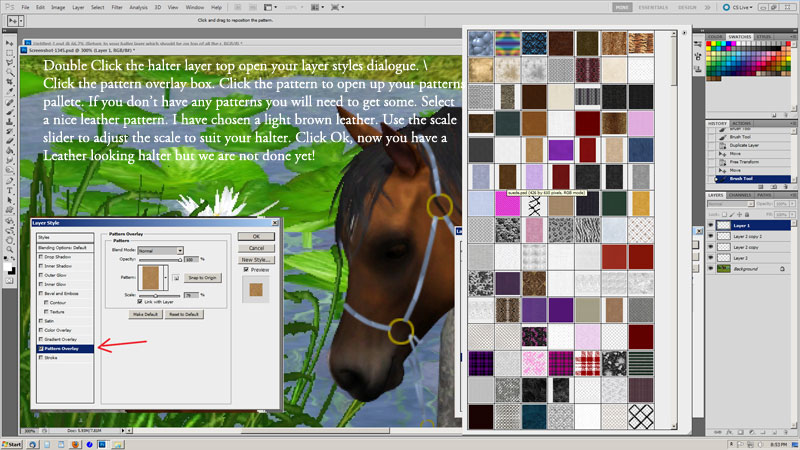
Now we are going to add a little realism to our halter. Double click the halter layer to open the layer styles window. Check the pattern overlay box and choose a nice leather pattern. If you do not have a leather pattern you can find some nice royalty free leather textures at http://www.cgtextures.com/index.php download a nice leather texture and create a pattern with it by going to Edit>Define pattern from. Then you will be able to choose it from your patterns and apply it to your halter layer. This step is only required if you do not already have a leather pattern. Once you have chosen your leather pattern you may need to scale it up or down to make it look correct you can use the scale slider in the properties dialogue to do this. Click ok now you have a leather looking halter but there is more to do!
|
|
|
Lets add some depth now. Double click the halter layer again to open your layer properties once more. This time we will add a drop shadow. I use a very small drop shadow just a couple of pixels in size and a couple of pixels away from the halter. You can use the settings in this screenshot as a starting point, make any changes you feel are necessary to give the effect you want and then click ok.
|

|
|
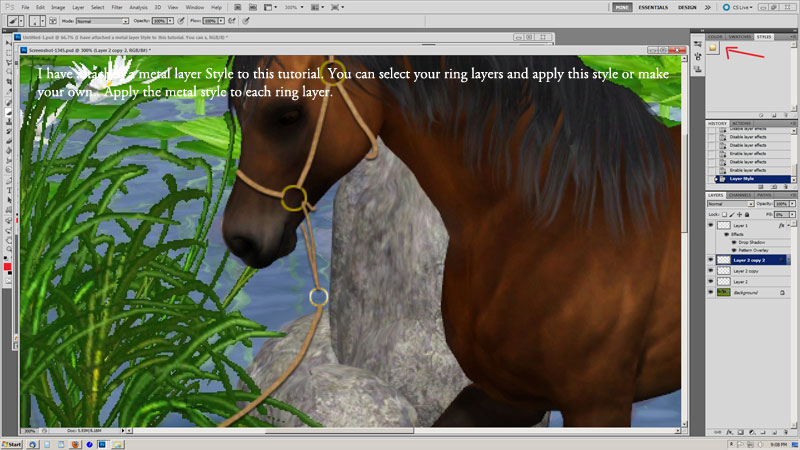
Now we will make our rings look like metal. Download the attached layer style and install it into your photoshop styles folder. Then load the layer styles from your styles pallete. You can also make your own layer style if you prefer. This is the one I use. Apply your metal style to all 3 rings.
|
| ||
|
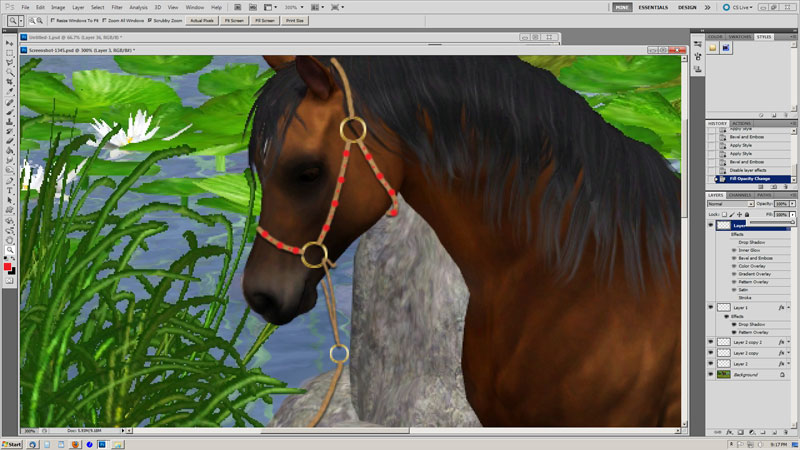
Now you can add embellishments to your halter if you like. I have added some simple beads to mine. To do this choose your round brush again and make it 1 pixel larger than your halter base, make a new layer and paint dots along your halter leather on the new layer. You can then choose a smaller brush maybe 1 or 2 pixels smaller than your halter leather and paint small dots between the large dots you just painted. If you want these to be a different color than the large beads paint them on a new layer. Now you can use layer styles to give them a beadlike appearance. The attached styles also include a simple bead like style. You can use it or make your own. You can change the color and the style in the layer properties.
|
|
|
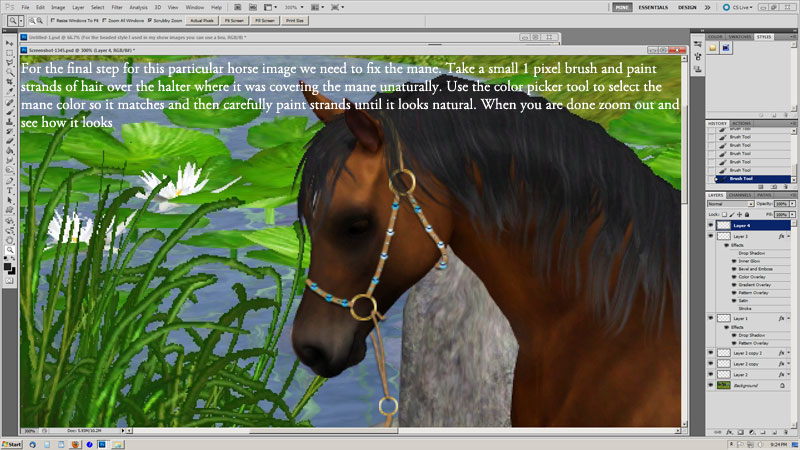
Finally because this horse has a long mane and it intersects with where we have painted our halter we need to fix the mane. Take a 1 pixel round brush, if you are using a tablet click transfer in your brush properties and set it to pen pressure. If you are using a mouse it may be trickier. Use the color selector tool to select a color from the mane section of your images. Using your small 1 pixel brush, paint strands of hair over the headstall where it intersects with the halter.
|
|
|
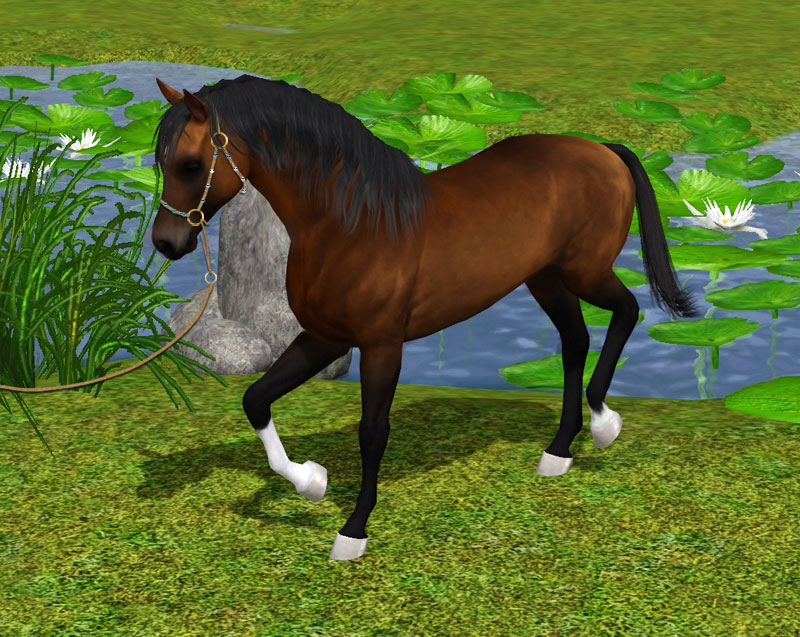
If all has gone well you should have a halter that looks something like this.
I hope you have enjoyed this tutorial. If you have any questions you can ask on the thread I posted at Equus sims or you can email me :) |
|
